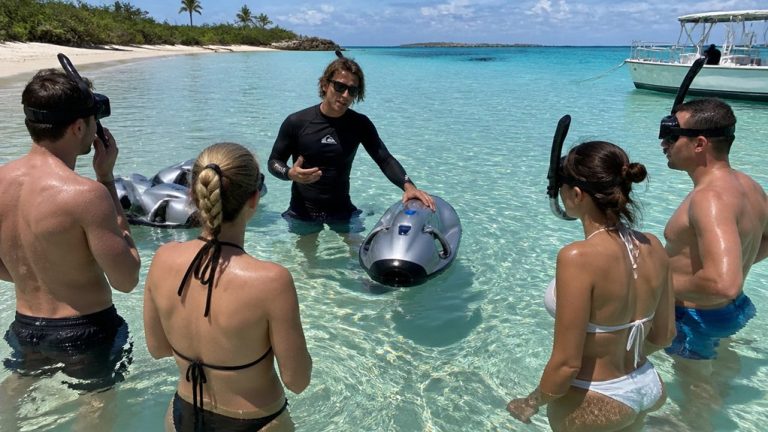
When you clip a phone underwater case to a sea scooter tour, your camera plan changes fast. Salt spray turns slick, buttons feel clumsy in gloves, and the reef can rush past in a blue blur if your housing can’t keep up. You’ll want the right depth rating, controls you can trust, and a mount that won’t wobble when the scooter hums. Get those choices right, and your footage starts looking a lot less like a wet mistake.
Key Takeaways
- Choose a housing for real tour depth: 15–20 m for surface rides, 40–60 m for most sea scooter tours, and 85 m+ for deep runs.
- Verify exact phone compatibility, because some cases need specific trays, adapters, or touch settings for your iPhone or Android model.
- Prioritize easy controls: full touchscreen or large physical buttons, plus secure grips or mounts for one-handed use while holding the scooter.
- For better footage, use 4K/60, add an underwater light, and consider wide-angle lenses or red filters for color and stability.
- Prevent leaks and fogging by checking O-rings, running a vacuum or dunk test, and drying the case fully before and after use.
How to Choose a Phone Underwater Case
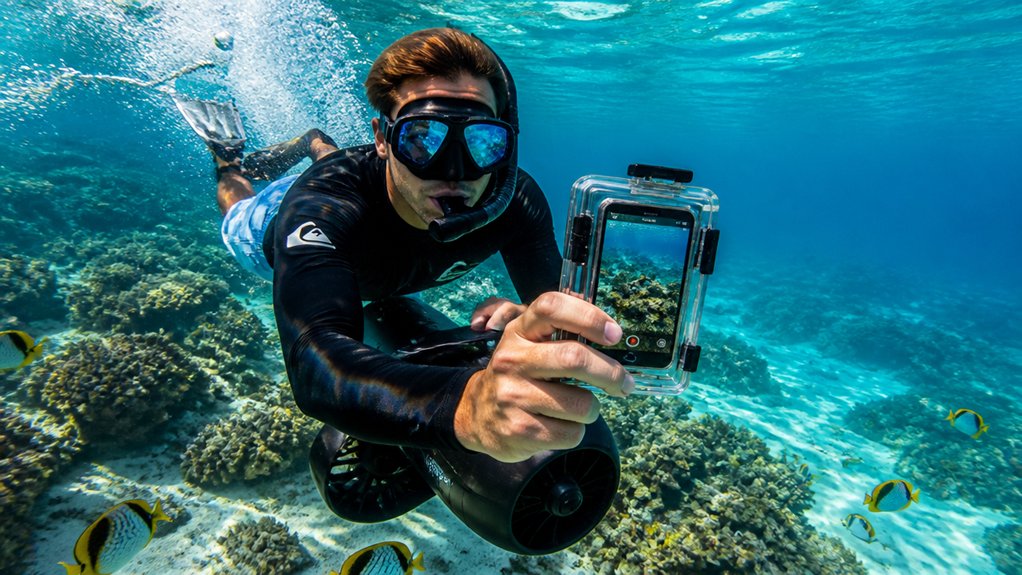
Before you zip off behind a sea scooter, make sure your phone case matches the water you’ll actually be in. Choose an underwater phone case built for your tour, not just pool play. If you want framing, previews, and app control while fish flicker past, pick a full touchscreen housing. Check your phone model first, because some setups need special touch settings or a tray. You’ll also want strong sealing, vacuum checks, and seal detection so a hard turn or splashy launch doesn’t become an expensive lesson. Look for a secure grip or 1/4-20 mounts if you plan to add lights, wet lenses, or a red filter. Creative GoPro mounts can also inspire how you position your phone case for steadier footage during sea scooter tours. After every ride, rinse the case, inspect the seals, and test it in shallow water at first.
How Deep Should Your Dive Case Be?
Once you’ve picked a case with the right controls and seals, the next question is simple: how much water pressure will it really face on a sea scooter tour? Match your depth rating to your planned max depth, then add margin for fast pulls, worn seals, and extra gear on your diving housing. In Waikiki, many sea scooter tours stay relatively shallow, so extreme depth ratings are often unnecessary for casual riders.
Choose a depth rating for your real max depth, then add extra margin for speed, seal wear, and mounted accessories.
- Near-surface snorkeling rides usually need only 15 to 20 m, which keeps bulk and cost down.
- If your sea scooter may tug you deeper or you’ll follow divers, choose 40 m to 60 m, and 60 m is a smart baseline for many tours.
- For deep freediving or technical runs, pick 85 m or more.
Always confirm the manufacturer’s depth rating fits your exact phone and accessories setup.
Which Cases Fit Your Phone?
Not every underwater case fits every phone, and that’s where the search gets practical fast. Before you book a sea scooter tour, check each housing’s phone compatibility list, not just the product name. SeaLife SportDiver Ultra fits iPhones up to 15 Pro Max and many Android models, including Samsung S Series Ultra phones. DiveVolk SeaTouch 4 Max lists adapters for iPhone 12 through 16, which makes upgrades less stressful.
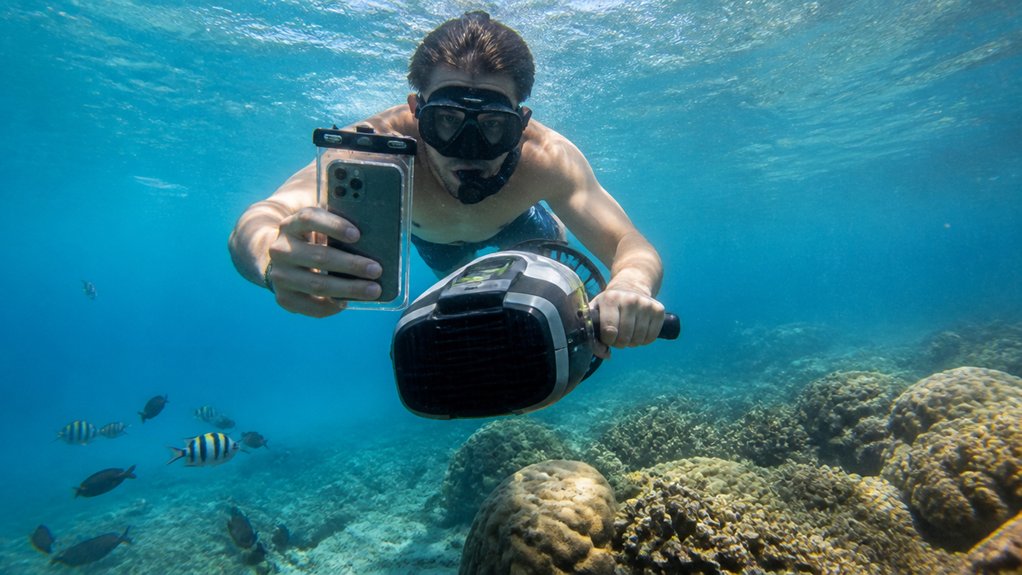
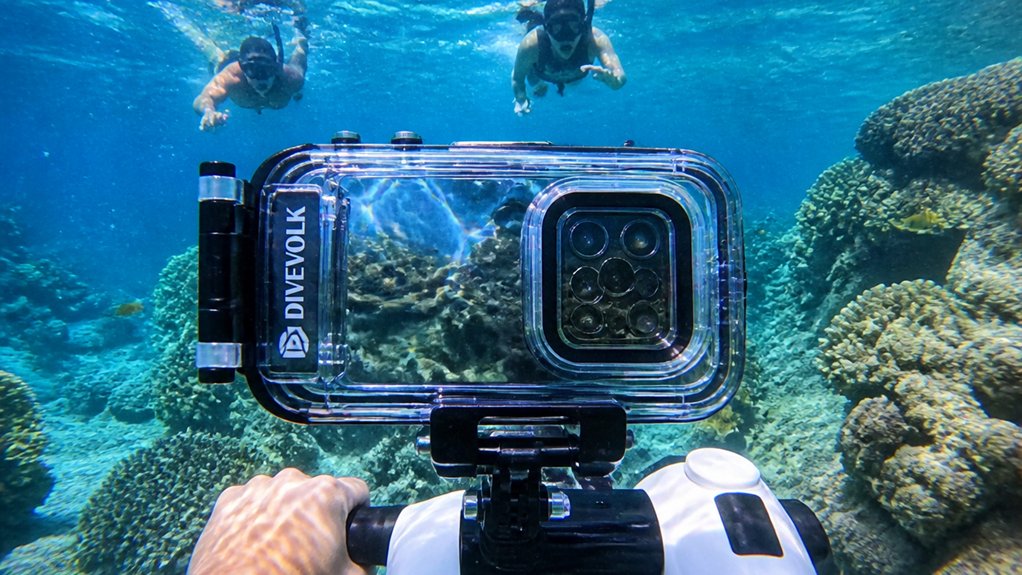
You should also match the depth rating to your plan. ProShot Touch works for shallow snorkeling at 50 feet or 15 meters. SeaTouch 4 Max and Nautismart or Oceanic+ go to 60 meters or 196 feet. If your Underwater Smartphone setup includes lenses, look for wet lens adapters, filter kits, and secure mounts for scooter brackets too. For capturing smoother footage during rides, review GoPro settings ideas from sea scooter adventure guides and apply similar stabilization and video choices where your phone case supports them.
Which Controls Work Best on Sea Scooters?
On a sea scooter, the best controls are the ones you can find by feel and press without thinking twice. When you’re underwater, that usually means big physical buttons, not tiny buckles or fiddly top controls. Gloves, vibration, and one-handed steering make simple controls feel brilliant. For a first sea scooter adventure, easy-to-find controls can help nervous beginners feel calmer and more confident underwater.
- Choose a large shutter trigger. You can squeeze it fast, even while your other hand manages the sea scooter.
- Look for a volume-button or side-button setup. A single press is reliable and quick when the scooter hums and the water jitters around you.
- Pick housings with chunky grips and thumb-rests. They steady your phone, reduce accidental taps, and keep your wrist happier on longer rides.
If touch controls are involved, calm water and a secure tray help. Otherwise, keep it simple and enjoy the view.
Do You Need a Touchscreen Underwater Case?
Do you need a touchscreen underwater case for a sea scooter tour? If you want full touchscreen access so you can use your phone’s camera app underwater, change zoom, tweak exposure, or shoot RAW, yes. A full-touch housing also lets you review clips mid-ride and open third-party apps, which can make underwater photography feel more flexible in shallow, warm water. To get clear shots, keep your lens area clean and steady your phone before you start recording.
If your tour is short and easy, you may not need it. A simple case with physical shutter buttons often works better when you’re mostly tapping record or snapping quick shots. That setup can feel steadier on a moving scooter, especially with gloves. Before you book, check phone fit, adapters, and mounts for lights or wet lenses. Underwater, fiddly gear can become comedy fast.
When to Choose a Hard Dive Case
When your sea scooter tour goes deeper than easy snorkeling, a hard dive case starts to make real sense. You want depth ratings around 40 m or more, because scooter routes can dip well below the bright surface zone. A rigid body also gives you steadier grip and better control when the motor pulls and bubbles rush past. On a sea scooter tour, conditions can change step by step from calm surface swimming to deeper, faster-moving stretches, so sturdy protection matters more than it would on a casual float.
- Pick vacuum-seal leak detection so you can spot trouble before salt water ruins your phone.
- Choose reliable underwater controls. Mechanical buttons or a responsive full touchscreen beat stabbing at soft plastic while moving.
- If you expect richer reef color at depth, choose a case that supports wet lenses and red filters. Also check buoyancy, since a runaway rig is nobody’s souvenir on a breezy dock afterward.
Which Accessories Improve Underwater Footage?
Often, the accessories make the biggest difference between shaky blue clips and footage that actually shows the reef the way you saw it. Add an underwater light to bring back reds, brighten shadowy coral, and cut the murky look that appears fast at depth. A full touchscreen housing like the SeaTouch 4 Max lets you adjust framing and manual settings without surfacing, which matters when the scooter keeps moving. Clip on a wide‑angle wet lens so you capture more reef, more fish, and less accidental cropping from sudden speed changes. A rigid tray or wrist float helps you hold steady with both hands. Shoot 4K/60 fps, and keep a red or magenta filter handy for cleaner color when the water turns beautifully strange below. For natural-looking color in sea scooter clips, a red filter can help correct the heavy blue cast that appears underwater.
What Can You Get at Each Budget?
Good footage also depends on how much case you can afford, because the gap between a $15 pouch and a full housing feels huge once the scooter starts pulling you past coral heads and sandy channels.
- Under $25, you get a floating PVC pouch. It’s fine for shallow sea scooter laps, but touchscreen response can feel moody, and depth claims stay vague.
- From $25 to $300, a real smartphone housing changes things. Hard cases bring better seals, button or full-touch control, and ratings from about 50 to 130 feet.
- From $300 up, you pay for leak detection, optical ports, wet lenses, and bright video lights. That’s where faster rides, deeper water, and greener light stop feeling like a real gamble on murky afternoons offshore.
Even with a premium case, fogging underwater can still ruin clear clips if trapped moisture condenses inside during the dive.
How Do You Prep Your Case Before a Tour?
Before the boat even leaves the dock, give your phone case the kind of attention you’d give a mask strap or fin buckle, because a sea scooter tour can turn a tiny seal problem into a expensive splash. Check the housing’s depth rating first. You want it comfortably beyond your planned diving depth, with a 5 to 10 meter cushion. Inspect the O-rings, clean them, add a light smear of approved silicone grease, then seat them neatly. Run a vacuum test if your case has one, or do a quick paper towel dunk test. Set airplane mode, disable auto lock, clear storage, and choose your camera settings. Then lock every latch, test the controls, and keep the Phone case protected from sand and knocks. It also helps to confirm any weight guidelines for your sea scooter tour ahead of time, since staying within tour limits can make handling your gear and phone case easier once you’re in the water.
How Do You Clean and Store It After?
Once the sea scooter is back on deck and the spray dries on your sleeves, your phone case needs a quick cleanup routine of its own.
- Rinse the housing and removable O-rings in fresh water right away after scuba diving. Salt, sand, and chlorine love hiding in seams.
- Inspect each seal, wipe away grit, and add only a thin film of approved silicone grease. If your case is rated for depth, treat those O-rings kindly.
- Leave the Phone case open to air-dry for 24 to 48 hours in shade. No heaters, no sunny windows. Then store it dry, padded, and cool with O-rings relaxed. Before your next tour, run a leak check and test buttons on a spare device first ashore.
Bringing a phone underwater case on sea scooter tours also makes it easier to protect your device before cleaning and storage even begin.
Frequently Asked Questions
Can You Use a Phone Underwater Case in Saltwater and Freshwater?
Yes, you can use a phone underwater case in saltwater and freshwater, but you’ll need to rinse it after saltwater exposure, inspect breathable seals, and stay within pressure limits to prevent leaks and saltwater corrosion.
Will Underwater Cases Affect Your Phone’s Audio in Recorded Videos?
Yes, you’ll often notice reduced audio quality because underwater cases cause microphone muffling and can trap wind noise. You can still record video, but only if the seal prevents water ingress and fits your phone.
Are Phone Underwater Cases Allowed in Carry-On Luggage for Flights?
Yes, you can usually pack phone underwater cases in your carry-on, but you’ll need to follow security screening rules, check battery restrictions for any powered accessories, and review international regulations before you fly with them.
Can You Attach Lights or Filters to a Phone Underwater Case?
Yes, you can, and just as your next dive surprises you, the right case accepts mounting adapters, magnetic attachments, and LED housings. You’ll need a compatible frame, secure seals, and buoyancy so your shots stay sharp.
Do Underwater Phone Cases Interfere With Emergency Phone Functions?
No, underwater phone cases usually won’t block emergency calls, but you should test touch response, speaker clarity, and button access. You may notice location accuracy, and waterproof notifications can be harder to hear or feel.
Conclusion
Choose your case like you choose your fins. Fit matters. Match the depth rating to your tour, test the O-ring, and clip on a light and wide lens before you leave the dock. Measure twice, cut once applies here, because one leak can end the show fast. When your scooter hums and the reef flashes blue, gold, and silver around you, you’ll want a housing that feels solid, simple, and ready for every turn underwater.