A sea scooter can turn a simple reef run into a smooth little film set, if your camera stays put when the motor hums and the water starts to push. You want a mount that shrugs off salt, clips on fast, and won’t vanish into the blue after one bad bump. A front tube gives you that clean forward view, while a rear stick can catch fins, bubbles, and the whole scene. The clever part comes next.
Key Takeaways
- Mount a GoPro on the front tube with a 3M adhesive base for the cleanest forward POV, and always add a backup tether.
- Use a clamp-style handlebar or stainless band mount with protective webbing for removable, saltwater-resistant mounting on constant-diameter tubes.
- Rear mounts capture wake and fins well; use a rigid bracket or extension pole for 360 cameras, plus a Dyneema or braided tether.
- Hood suction mounts work for short, calm-water runs, but require a smooth surface, frequent seal checks, and a tether to a D-ring.
- Avoid zip ties and adhesive-only setups for heavier cameras; use corrosion-resistant hardware, inspect mounts before each trip, and unclip cameras during transfers.
Best GoPro Mounts for Sea Scooters
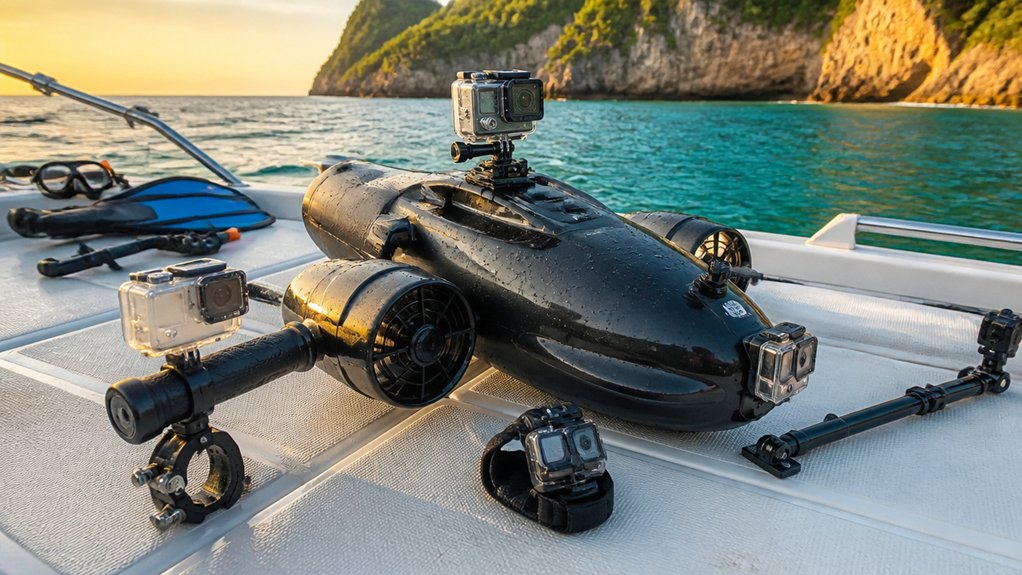
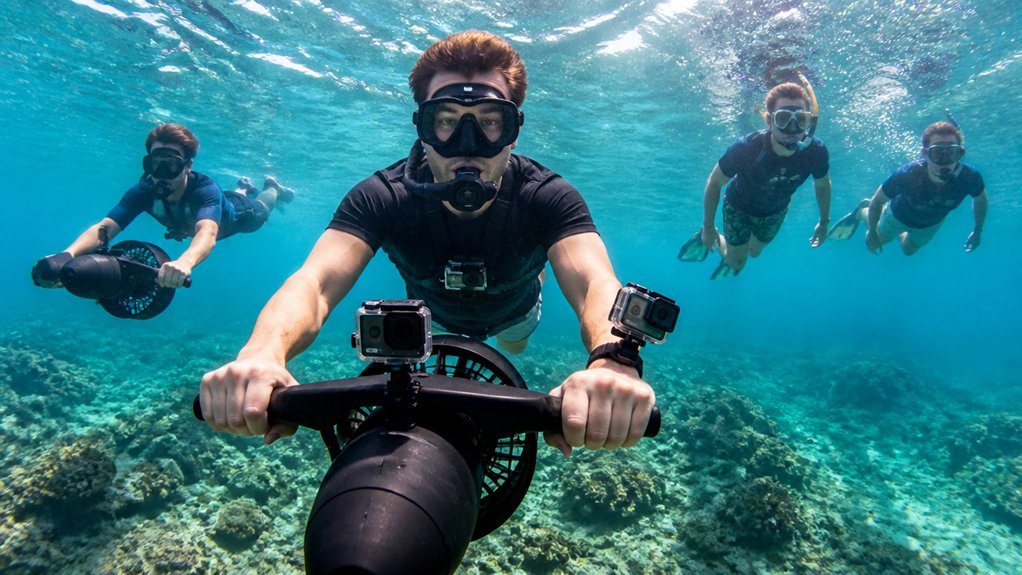
Start with the mount that matches the shot you want most. For a classic forward POV, stick a 3M GoPro adhesive mount on the front tube and point your action camera straight ahead. You’ll catch bubbles, reef edges, and your scooter’s nose slicing through clear blue water. If you want immersive coverage, place an Insta360 on the rear with a HoldFast hard bracket or similar adjustable mount. For easy no-drill options, use a clamp-style tube mount, like a handlebar mount or a stainless band clamp with protective webbed tubing. Need something temporary? A suction-cup mount on the hood works for short runs, but tether it to a D-ring or D-clip. Dial in your camera with best GoPro settings before the tour so your mount choice captures cleaner color and steadier underwater footage. Skip chest or helmet straps for scuba diving scooters. They wander at high speed.
What Makes a Sea Scooter Mount Stable?
Picture the pull first, because a stable sea scooter mount has to beat vibration, water pressure, and the sudden jolt of a fast turn. You want a Camera Mount that grips hard without chewing up the scooter. Clamp mounts work well because they hold a constant-diameter tube and let you rotate 360 degrees to counter torque.
The best clamps use wide stainless bands and protective webbed tubing. That spreads force across more surface, cuts slippage, and shrugs off saltwater. Since many tours include wetsuits and gear, your mount should stay secure without interfering with any provided equipment or accessories. Suction cups and quick-release options feel handy, but you should check them often since vibration can break the seal. Adhesive pads stay sleek, yet they need a large clean dry area and can weaken after shocks. Whatever you choose, add a tether. Even your wrist mount or head mount deserves backup offshore too.
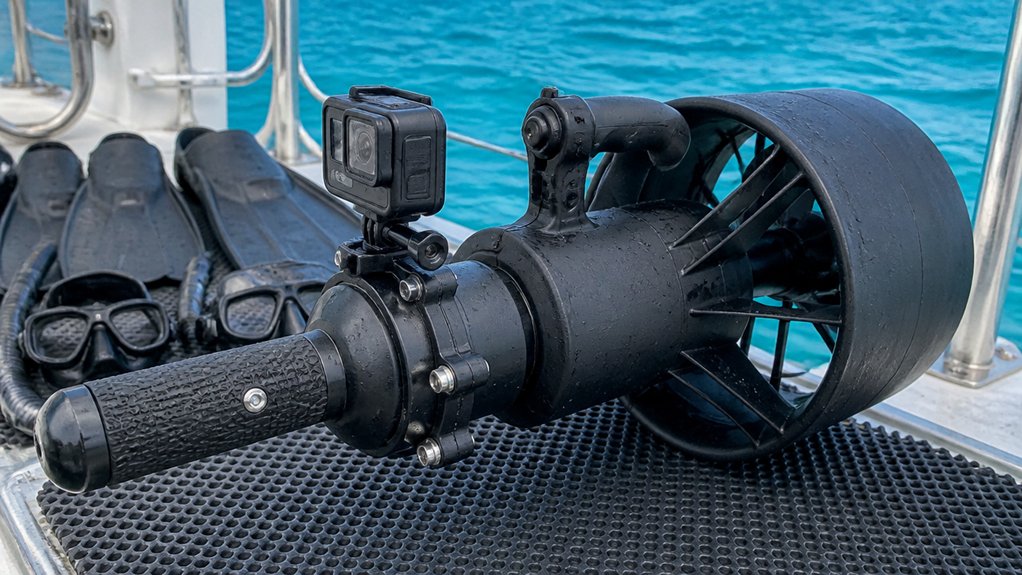
Front Mounts for Forward GoPro Shots
Lock the camera onto the front tube and you’ll get the cleanest forward POV, with the scooter pulling you straight into the blue. For the best GoPro mount, stick a 3M adhesive base there, then back it up with a tether to a D-ring. Keep your phone protected in a phone underwater case so it stays dry during sea scooter tours.
| Mount | Why use it |
|---|---|
| 3M adhesive | True forward view |
| Clamp mount | Removable, rotates 360° |
| Suction cup | Fast on smooth hoods |
If you want a removable setup, use a corrosion-resistant handlebar mount or stainless band clamp with webbed tubing so the finish stays scratch-free. Skip drilling. It weakens the body and solves nothing. A suction cup works for quick shots, but rough handling can pop it loose. Before boat transfers, unclip the front camera at your safety stop and stow it securely.
Rear Mounts for GoPro and 360 Cameras
When you move the camera to the rear, the whole ride changes, and you get your wake, fins, and the long blue trail behind you in the frame. For rear stabilization, bolt or clamp a HoldFast hard-mount bracket at the scooter tail so your 360 camera stays true under thrust. Use a stainless-steel band clamp over webbed tubing to protect the tube, improve mounting ergonomics, and stop slide or abrasion. Skip zip-ties. They creep, chafe, and fail early in salt water. If you prefer a low rear POV, stick a 3M pad to a flat surface and add a tether or D-clip. For taller 360 shots, secure a rigid extension arm in a rod-style holder, then clip off fast at safety stops. Keep the scooter’s weight limit in mind when adding rear mounts or extension arms so handling stays predictable on the tour. Practice camera hygiene.
Hood Suction Mounts: Pros and Risks
If you want a fast setup on the scooter hood, a suction-cup mount gives you a clean way to aim the GoPro forward without drilling holes or wrestling with straps.
It shines on smooth curves for tours in calm water, where you catch ripples, bubbles, and the scooter’s nose slicing on. Surface prep matters. Wipe the hood dry, protect the finish with foam or webbed tubing, and watch seal maintenance closely because saltwater, temperature swings, and wind effects can weaken grip. Re-seat the cup often. Always add a tether, like a lanyard to a D-clip, so seal failure doesn’t send your camera into the blue. For rough transfers or fast runs, remove it or back it up with a hard mount. Lenses hate impacts. Good placement can also help you get clear shots by keeping the camera steady and aimed cleanly through the water during a sea scooter tour.
Tube Clamp Mounts for DPVs
Tube clamp mounts give you a tougher option than suction cups, especially on a DPV that sees salt, bumps, and busy boat decks. A GoPro clamp mount grabs common scooter tubing with a hinged, non-slip bite, and its 360 degree adjustability helps you frame reef passes or your buddy’s bubble trail. For longer use, wrap tube padding or webbed tubing under a stainless band clamp to protect the finish and steady the camera. Pick corrosion resistant fasteners and add a tether, because salt, vibration, and transfer chaos can shake loose weaker gear. A small D ring lets you unclip the camera fast during boat hand offs. Skip drilling. Use delrin or stainless tube clamps instead, and check rotation limits so the camera stays clear of controls and switches. Before the tour, pack your essential gear so your camera setup stays secure and easy to manage on the boat.
DIY Sea Scooter Mounts That Hold
You can rig a sea scooter mount that actually holds by mixing simple straps, clamps, and a few smart backup pieces. Try a 3M sticky mount on the nose for a clean forward view, or use a band clamp, tube clamp, or even a repurposed head strap when you want a tougher grip that still comes off fast. If you use a suction cup for a quick run, tether the camera every time so one hard buzz through the water doesn’t send it spinning into the blue. This setup also helps you capture a sea scooter tour with steadier, more usable footage.
Strap And Clamp Builds
Strap and clamp builds really shine when you want a mount that holds tight through chop, turns, and the awkward shuffle back onto the boat. Start with strap innovations that wrap webbed tubing under a stainless band clamp or a HoldFast-style rear bracket. You protect the paint and get a steadier rear angle than zip-ties ever give. Clamp ergonomics matter too. A GoPro handlebar or seatpost mount fits scooter tubes well, rotates 360 degrees, and pops off fast with a quick-release D-clip. If you like budget fixes, thread a giant zip tie or steel band through a helmet plate, cinch it hard, and tether it. Hybrid fasteners keep things simple, secure, and drill-free, which saves your scooter from ugly DIY regrets later on. Before launch, build in check-in timing so you are not rushing final clamp checks when arriving early for your sea scooter tour.
Suction And Adhesive Mounts
For a faster setup with less hardware, suction cups and adhesive pads make a handy next move. You can stick a 3M GoPro pad on a scooter tube for a clean front view, where bubbles peel away and the nose cuts through green water. Check adhesive compatibility first, then press it onto a clean, dry surface and treat it as semi permanent for a single trip. If you want a quick release option, a suction cup on the hood gives you repositioning between stops. Wet curves can loosen the seal, so suction maintenance matters. Inspect it often and keep the contact area smooth. To reduce underwater lens haze, add anti-fog inserts or prep the housing carefully before the ride. For heavier cameras, skip adhesive alone and use a HoldFast style bracket or a stainless band clamp over protective webbing instead.
Tethers That Prevent Loss
Backups save the day when a mount lets go, and underwater that little extra line can mean the difference between a great clip and a camera vanishing into green haze. Build in visual tethering from the start.
- Pair a 3M front mount with a braided nylon tether, at least 150 lb rated, clipped to a D-ring.
- Swap zip ties for a webbed, stainless band clamp and corrosion resistant fasteners, then add a D-clip for transfers.
- On rear Insta360 setups, hard-mount the bracket and run thin spectra or dyneema to the frame. A buoyant leash helps too.
Use existing tubes or suction cups with backup lines. Check knots and hardware before each dive. Your lens will thank you when the scooter bumps a busy ladder. First-time riders asking real questions in a sea scooter tour FAQ often want simple loss-prevention tips like adding a visible backup tether before the ride starts.
Tethers That Keep Your GoPro Safe

You’ll want a backup tether on every GoPro mount, with a thin stainless cable or coiled leash clipped to a secure D-ring or webbed loop on the scooter. Before boat transfers or safety stops, clip the housing to that D-ring so your camera doesn’t knock around and end up with a scratched lens and a sad little rattle. That extra tether behind your main adhesive pad or clamp gives you real peace of mind when the scooter jolts, turns hard, or bumps through choppy water. On tours where riders can breathe normally, a secure tether also lets you focus on the experience instead of constantly checking whether your camera is still attached.
Secure D-Ring Backups
Thinking ahead to hand-offs and boat pickups, clip your GoPro to a solid anchor point on the scooter so a slip doesn’t turn into a sinking feeling.
Good backup anchors use a stainless D-clip and short braided tether on a D-ring, handle, or webbed tubing. Skip zip-ties. They creep and chafe. A corrosion-resistant band clamp wrapped over protective webbing gives tube scooters a drill-free tether point and saves the finish from ugly gouges after salty days at sea for longer.
On Hawaii tours, secure tethers also support reef etiquette by helping prevent dropped gear from scraping or disturbing delicate coral areas.
- Add secondary lanyards from the housing to the scooter when you use adhesive mounts.
- Use redundant clips with a quick-release at the camera mount for fast, clean securing.
- Band-clamp a protected D-ring to tube DPVs with webbing underneath, so stainless bites hold, not paint.
Clip Before Transfers
Clip it on before any transfer, and your GoPro is far less likely to take a hard bounce off a swim step or disappear into blue water. Make that your surface protocol. At the safety stop, remove the camera and clip its housing to the scooter’s D-ring or your BC webbing. A large D-clip or quick-release gives you glove-friendly control and works with one hand during a busy handing technique. Use a short, strong leash like webbed tubing or braided shock cord with a stainless band clamp, not a zip tie. Good crew coordination starts before you surface. If you’re using suction or adhesive mounts, add a buoyant quick-release lanyard so a failed mount doesn’t send your camera to the fish for inspection duty. This fits neatly into step by step transfer habits on a sea scooter tour, where securing gear before handoffs helps prevent drops and delays.
Tether Mount Redundancy
Surface handling gets safer when your mount has a backup plan. You should always pair the main mount with secondary tethering. Even strong 3M pads or HoldFast brackets can fail after salt, spray, and knocks. A thin nylon cord or stainless safety cable rated for 50 pounds adds real insurance. If your trip operator has accessibility questions about gear handling, ask whether your tether setup can stay attached during assisted entries, exits, or boat transfers.
- On tube scooters, run the tether through a D-ring or webbed loop held by a stainless band clamp. That gives you redundant anchors.
- Add a quick-release D-clip or small carabiner, so you can clip off fast during safety stops or boat handoffs. Your lens will thank you.
- Use low-stretch fail safe lanyards with a foam floaty. Check cord, clips, and adhesive before every trip, and remove the camera when you aren’t filming.
Secure Extension Pole Setups
Start with a corrosion-resistant extension pole in aluminum or stainless steel, then fix a 3M adhesive GoPro mount to the front of the sea scooter for steady, forward-facing shots that don’t wobble every time the motor hums. Add a stainless band clamp at the base and wrap webbed tubing around the scooter tube so nothing slips or scuffs. Good pole ergonomics matter underwater, especially when current pushes back. If you want cleaner flow pair the setup with hydrodynamic fairings and keep your corrosion prevention routine strict after every saltwater run. Tether the pole end to a D-ring with a D-clip and safety cord so a failed mount doesn’t send your camera exploring alone. For 360 cameras use a rigid stick in a rear holder. On an underwater sea scooter tour in Oahu, a secure forward mount helps beginners capture stable footage while they get used to handling and buoyancy.
Quick-Release Mounts for Boat Transfers
When you reach the boat, a quick-release mount lets you unclip your GoPro in seconds and snap the camera’s D-clip to a scooter D-ring before you hand it up. At the safety stop, you can pop the camera free just as fast and clip it to a dedicated ring on your BCD or scooter, which keeps the lens safe from bumps and wet chaos. It’s a simple system, but in choppy water and clacking ladders, that extra step can feel wonderfully calm. If you’re driving to the marina, planning Waikiki parking ahead of time can make the whole transfer to your sea scooter tour feel even easier.
D-Clip Transfer Method
Here’s a simple trick that really pays off during boat pickups: use a D-clip on your camera housing with a short tether, so you can snap it onto a D-ring on the scooter in seconds.
Before you board, unmount the camera and secure it near the handle. That quick release technique keeps your hands free and your lens out of trouble.
For many Waikiki departures, this setup is especially useful right at the pickup point, where fast handoffs and secure gear management matter most.
- Choose glove friendly clips and practice one-handed clipping.
- Add a stainless band clamp with webbed tubing for corrosion resistant anchoring.
- Clip to a dedicated D-ring or loop, not just the tether.
You’ll avoid the sickening clack of a lens hitting fiberglass, and you won’t juggle camera, scooter, and ladder like a circus act. It feels tidy, fast, and strangely satisfying every single time.
Safety Stop Removal
As the safety stop ticks down, unclip your GoPro before you reach the boat and the whole handoff gets calmer fast. Choose a D-clip or buckle built for rapid removal, then use tethered clipping to secure the camera to your harness or scooter loop. That keeps your hands free when the deck crew grabs the scooter.
| Mount | Why |
|---|---|
| Quick-release plus tether | Fast, secure |
| Front fixed mount | Lens-risk at transfer |
Do gloved practice topside and time it. You want a smooth, single-handed move in under ten seconds, ideally under five at the stop. If the ride back turns into rough waters, that quick-release setup also reduces the chance of fumbling the camera during a choppy boat transfer. Boat rails clack, scooters bump, and lenses hate surprises. Clip to a stainless-steel band-clamped webbing loop if your scooter has one, because that habit can save a housing from an ugly knock.
GoPro Mount Mistakes to Avoid Underwater
Although a sea scooter makes filming feel effortless, a few mount mistakes can turn a smooth glide into a rattling scavenger hunt on the seafloor. Your waterproof housing won’t save a bad mount. Skip adhesive-only setups on dirty or curved tubes, even with depth rated adhesives, and add a tether. For anyone on a first-timer walkthrough, practicing your mount setup before the Waikiki underwater scooter tour can make the ride smoother and your footage more reliable.
- Don’t trust zip-ties alone for long runs; padded stainless band clamps grip better.
- Remove the camera during boat transfers and safety stops, then clip it to your D-ring.
- Avoid drilling or suction-cup-only mounts; choose tube clamps and consider buoyancy compensation.
That way you hear only the scooter’s soft whir, not the clack of a shifting camera, and you spend more time watching reefs flicker by than searching for gear in blue water below you.
Top GoPro Mounts to Buy Now
Once you’ve ruled out the shaky setups, shopping for a mount gets a lot more fun. For tube-frame scooters, GoPro’s Handlebar/Seatpost/Pole Mount at $39.99 is an easy buy. It clamps down securely and spins 360 degrees for forward or side views. If you want quicker angle changes, the Jaws Flex Clamp Mount costs $59.99 and grabs tubes, hoods, or railings with real confidence.
For dive tours, Bigblue’s Easy Release Mount Series adds corrosion-resistant quick release and lighting support, which beats fumbling with selfie rigs underwater. Aftermarket delrin or stainless scooter mounts also give you secure, adjustable options without drilling. Even stainless band clamps can work if you add protective webbing. Skip battery mounts and trust wrist straps or a tether with any rigid setup. Before buying, review Ala Wai Harbor tour conditions so your mount choice matches the water and ride style.
How Should You Test a Mount?
Start on land and get a little rough with the mount before the ocean does. Begin with pre dive calibration, then grip and twist the setup with 2 to 3 kgf in every direction. Your goal is simple: no slip, no creak, no surprises. Dry sand and dock thumps are teachers.
Test it topside first: twist hard, thump it dry, and listen closely. Better the dock finds weakness before the sea does.
- Do shallow stress test protocols with a tethered drop in 1 to 2 meters of water. Add a float and watch the adhesive or clamp.
- Run a one to two minute ride at normal scooter speed. If you spot vibration, rotation, or loosening, stop and reinforce it.
- Practice a mock hand off, then finish with a post test inspection. Check pads, suction rims, clamp teeth, and bands for lift, fatigue, or weird warping.
Frequently Asked Questions
Can Saltwater Affect Gopro Battery Life During Long Sea Scooter Tours?
Yes, you can see GoPro battery life drop because saltwater accelerates corrosion effects, risks electrolyte intrusion, and promotes seal degradation; cold water and high-power settings drain batteries faster, so you’ll want rinsing, drying, and spares.
Which Gopro Video Settings Work Best in Murky Coastal Water?
Want clearer footage? Use 2.7K or 4K at 30 fps, Wide, Protune, high bitrate, Auto white balance, flat color, EV -0.5, and low/medium sharpness; you’ll handle low light better and simplify color correction later easily.
Do Local Marine Parks Restrict Camera Mounts on Sea Scooters?
Yes, you’ll often face marine park regulations on sea scooter camera mounts: they can ban drilling, long extensions, or heavy rigs near protected species, require attachment permits, and force you to remove cameras during transfers.
How Should You Rinse and Store Mounts After Ocean Use?
Give mounts a freshwater rinse for 5–10 minutes, then soak metal parts briefly with mild soap. Follow a shaded drying procedure, inspect pads and straps, and store separated in a storage container with silica gel.
What Insurance Covers Lost Gopros During Guided Sea Scooter Tours?
Worried you’ll lose it? You’re usually covered by travel insurance with a personal contents add-on; rental liability rarely covers your GoPro. Check exclusions, claim deadlines, and proof requirements, so you can get reimbursed after loss.
Conclusion
Pick a mount that stays calm when the scooter hums and the salt starts to bite. You’ll get the cleanest forward view from a front tube base with a tether, and the richest wraparound feel from a rear 360 setup. Test every clamp, tug every lanyard, and practice quick swaps before you leave the boat. Then you can chase reefs, bubbles, and silver flashes of fish, while your camera rides steady instead of doing improv.